
Entrepreneurs and brand marketers employ chatbots to handle the bulk of chats queries. This way, a large number of queries could be easily handled with minimum costs. Chatbots help reduces the dependence on human customer service representatives (CSR). These chatbots vet out common queries so that the human CSR cold focus on queries that require processing of multiple information sources. Since chatbots steer all conversation toward a pre-set direction, it is easy and time-efficient to use these chatbots instead of human CSR.
In this article, I will create a simple Facebook chatbot that could carry out an effective conversation with the users. The process of creating the chatbot comprises of several interconnected steps.
Create a Page on Facebook
The first step is the creation of a Facebook page. This requires an active account. Login and then create a page. Select the appropriate category and then fill in required information including page name, address and contact information. Complete the process of page creation. For the purpose of this tutorial, I have created a page named Cloudways School.

Create a Facebook Application
The second step is the creation of the Facebook application that interfaces between the chatbot and the facebook page chat. To create the app, go to Facebook Developers page and click Add New App. Add all required information and click Create App ID button. Facebook might ask you to verify a CAPTCHA code.
The app will appear in the developer dashboard. Open the application and add messenger platform to the app.
Next, add the webhook that connects the app to the website. To add the webhook, generate the page access token.
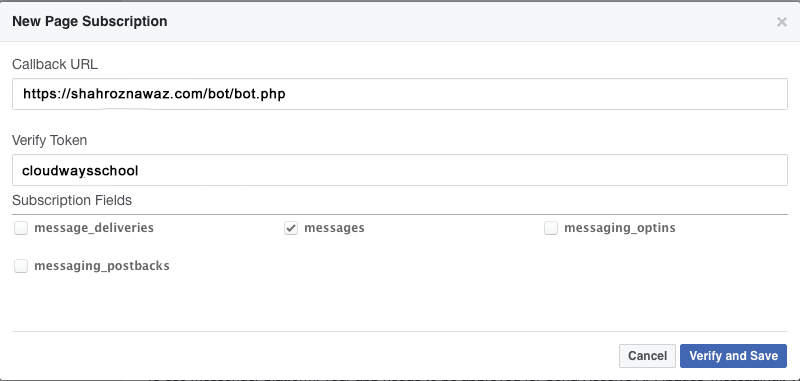
Next, define the callback URL and the access token. Right below the token generation tab, go to the Webhook tab and click Setup Webhooks.Insert the URL. note that, in order for this to work, the URL must be in https format.
Create bot.php File
The Facebook app is now active. I will now create the file for the bot.Create a new file named bot.php and add the following code to it. This code is based on Remy Mellet’s code of a simple Facebook Messenger bot. I have added more code that handle structured messages sent to the bot. The basic code is:
// parameters
$hubVerifyToken = 'cloudwaysschool';
$accessToken =   "EAxxxxxxxxxxxqgBAKWAgizvoHnQLZBR7ZxxxxxxxxxxxxxxxxxxxxxxxxxxxxxptYSymSdocFFCp1ink3EHRVMrCSxxxxxxxxxxxxxxxxxxxxwMZApStyA8GbqAxxxxxxxxxxxxxxxxxxxxxxxxxxx9R6QttFVyNS4ZBurwZDZD";

// check token at setup
if ($_REQUEST['hub_verify_token'] === $hubVerifyToken) {
  echo $_REQUEST['hub_challenge'];
  exit;
}

// handle bot's anwser
$input = json_decode(file_get_contents('php://input'), true);

$senderId = $input['entry'][0]['messaging'][0]['sender']['id'];
$messageText = $input['entry'][0]['messaging'][0]['message']['text'];
$response = null;

//set Message
if($messageText == "hi") {
    $answer = "Hello";
}

//send message to facebook bot
$response = [
    'recipient' => [ 'id' => $senderId ],
    'message' => [ 'text' => $answer ]
];

$ch = curl_init('https://graph.facebook.com/v2.6/me/messages?access_token='.$accessToken);
curl_setopt($ch, CURLOPT_POST, 1);
curl_setopt($ch, CURLOPT_POSTFIELDS, json_encode($response));
curl_setopt($ch, CURLOPT_HTTPHEADER, ['Content-Type: application/json']);
if(!empty($input)){
$result = curl_exec($ch);
}
curl_close($ch);
For instance, if the user sends Hi, the keyword is matched and triggers a reply. The code that executes this function is:
if($messageText == "hi") {
    $answer = "Hello";
}

//send message to facebook bot
$response = [
    'recipient' => [ 'id' => $senderId ],
    'message' => [ 'text' => $answer ]
];
Upload and Test bot.php
Since the Facebook webhooks supports only https, bot.php could only be tested on a hosting platform that supports SSL. Fortunately, all top hosting providers offer some form of SSL. For the purpose of this tutorial, I am using Cloudways. I have installed Letsencrypt for my application and point it to the domain. A staging URL is always provided with every Cloudways app. However, I have pointed my domain to symfonyfeed.com. Simply upload bot.php in public_html folder using Filezilla.At this point, when you say hi on the facebook page, you will get hello in reply.

Send Structured Messages
In addition to Hello , in reply to hi, Facebook Messenger also provides several interesting template messages that cover latest news, image and list messages. Button links could also be sent in response. Some common message templates are:-Button Template
-Generic Template
-List Template
-Receipt Template
I will explain you some of the templates here to kickstart your 1st messenger bot in php. You can see the complete documentation for the message templates could be found here.
Generic Message
Facebook Messenger provides several templates that could be used to send responses to the users. For example, if a user wishes to inquire about the latest blog on your website, they could send a blog. The generic response would be like: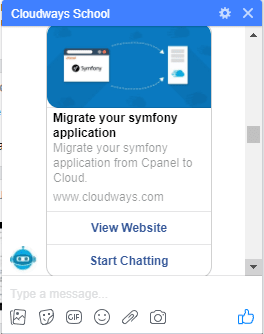
Let’s make a new condition for this message. Try out the following code:
if($messageText == "blog"){
     $answer = ["attachment"=>[
      "type"=>"template",
      "payload"=>[
        "template_type"=>"generic",
        "elements"=>[
          [
            "title"=>"Welcome to Peter\'s Hats",
            "item_url"=>"https://www.cloudways.com/blog/migrate-symfony-from-cpanel-to-cloud-hosting/",
            "image_url"=>"https://www.cloudways.com/blog/wp-content/uploads/Migrating-Your-Symfony-Website-To-Cloudways-Banner.jpg",
            "subtitle"=>"We\'ve got the right hat for everyone.",
            "buttons"=>[
              [
                "type"=>"web_url",
                "url"=>"https://petersfancybrownhats.com",
                "title"=>"View Website"
              ],
              [
                "type"=>"postback",
                "title"=>"Start Chatting",
                "payload"=>"DEVELOPER_DEFINED_PAYLOAD"
              ]
            ]
          ]
        ]
      ]
    ]];

     $response = [
    'recipient' => [ 'id' => $senderId ],
    'message' => $answer
];}
List Messages
Facebook Messenger bot could also send lists in response to the users’ queries. For instance, if the user wishes to see the list of all the latest blogs published, all the user could send today. In response, the bot sends a list.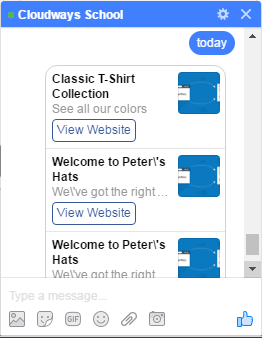
Add this code to bot.php to test this option:
if($messageText == "today"){

 $answer = ["attachment"=>[
      "type"=>"template",
      "payload"=>[
        "template_type"=>"list",
        "elements"=>[
          [
             "title"=> "Classic T-Shirt Collection",
                    "image_url"=> "https://www.cloudways.com/blog/wp-content/uploads/Migrating-Your-Symfony-Website-To-Cloudways-Banner.jpg",
                    "subtitle"=> "See all our colors",
                    "default_action"=> [
                        "type"=> "web_url",
                        "url"=> "https://www.cloudways.com/blog/migrate-symfony-from-cpanel-to-cloud-hosting/",
                        "webview_height_ratio"=> "tall",
                        // "messenger_extensions"=> true,
                        // "fallback_url"=> "https://peterssendreceiveapp.ngrok.io/"
                    ],
            "buttons"=>[
              [
                "type"=>"web_url",
                "url"=>"https://petersfancybrownhats.com",
                "title"=>"View Website"
              ],
            ]
          ],
            [
            "title"=>"Welcome to Peter\'s Hats",
            "item_url"=>"https://www.cloudways.com/blog/migrate-symfony-from-cpanel-to-cloud-hosting/",
            "image_url"=>"https://www.cloudways.com/blog/wp-content/uploads/Migrating-Your-Symfony-Website-To-Cloudways-Banner.jpg",
            "subtitle"=>"We\'ve got the right hat for everyone.",
            "buttons"=>[
              [
                "type"=>"web_url",
                "url"=>"https://petersfancybrownhats.com",
                "title"=>"View Website"
              ],
            ]
          ]

        ]
      ]
    ]];

  $response = [
    'recipient' => [ 'id' => $senderId ],
    'message' => $answer
];


}
elseif($messageText == "hi") {
    $answer = "Hello";
      $response = [
    'recipient' => [ 'id' => $senderId ],
    'message' => [ 'text' => $answer ]
];
}
Button Messages
Facebook Messenger could also send actionable buttons as a response. For example, if the user asks for more the response would be:To send buttons as response, try out the following code:
if($messageText == "more") {

  $answer = ["attachment"=>[
      "type"=>"template",
      "payload"=>[
        "template_type"=>"button",
        "text"=>"What do you want to do next?",
        "buttons"=>[
          [
            "type"=>"web_url",
            "url"=>"https://petersapparel.parseapp.com",
            "title"=>"Show Website"
          ],
          [
            "type"=>"postback",
            "title"=>"Start Chatting",
            "payload"=>"USER_DEFINED_PAYLOAD"
          ]
        ]
      ]
      ]];

      $response = [
    'recipient' => [ 'id' => $senderId ],
    'message' => $answer
];
}
I read a weblog, I hope that it doesn't sadden me as much as this one. I’m talking about, I know it was my selection to read, but I actually thought you'd have something interesting to say. Great work admin..
ReplyDeleteChatbot Company in Dubai
Chatbot Companies in Dubai
Chatbot Development
Chatbot Companies
AI Chatbot Development
Chatbot Companies in UAE
Chatbot Company in Chennai
Chatbot Company in Mumbai
AI Chatbot Companies
Chatbot Development Companies
Black Friday sale on cloudworks is on. Grab it now
ReplyDelete